Selfhosting AI Models for Local Production

Table of Contents
Having a local LLM to help you out in your day-to-day tasks can be a game-changer. Whether you're a researcher, a developer, or a business owner, having a local LLM can save you time and money, and specially give you more control over your data and the conversations you have with your AI model. Lately, in 2025, many concerns have been raised on how the AI companies are using the data users are providing to them via the use of the chatbots. Because of this, data control, specially when it relates to private documents, is becoming more important than ever. Therefore, despite the cost of maintaining a local LLM, it is a better option for those who value their data privacy and security.
This post will be a guide to help you set up a local LLM on your server and serve as documentation of the process for future references.
As the goal in this specific case is to emulate a chatbot-like experience, we will be using Ollama and Open-WebUI to provide a user-friendly interface for interacting with the LLM. This will allow us to have a more personalized experience and to have more control over the conversations we have with the LLM. Also it will offer the end user a familiar environment to interact with the LLM as most of end user nowadays have some sort of chatbot experience, specially when it comes to ChatGPT.
Despite this, the process is not limited to chatbot-like experiences and once having ollama installed, you can use it to run any LLM you want, for any purpose you want and connect it to any application you want, not necessarily a chatbot but other applications that can connect to ollama to make use of the LLM. The most important aspect of the guide is the being able to succesfully make ollama communicate with your GPU hardware in order to fully leverage the power of your GPU.
The OS that this guide refers to is Ubuntu 24.04.5 LTS, so therefore, the commands and instructions will be specific to this Linux flavor. If you are using a different OS, you will need to adapt the instructions to your specific Linux flavor, but the overall process will be the same.
Hardware Context
- CPU: Intel Core i9-14900K
- RAM: 128GB DDR5-5600
- GPU: ASUS ROG-ASTRAL-RTX5090-O32G-GAMING
Software Context
- OS: Ubuntu 24.04.5 LTS
System Preparation & NVIDIA Driver Installation
The first step into getting this done is to install the correct NVIDIA driver and verify that the OS can communicate with your GPU. As for that we need to make sure our system is up to date first. Then, because of nvidia drivers are propietary, we need to tweak our BIOS/UEFI settings to allow the driver to be installed and run correctly by disabling secure boot or configuring the CSM (Compatibility Support Module) and MOK (Machine Owner Key). Then we need to find the specific driver that can be used in our environment and install it.
-
Update System Packages: Ensure all system packages are up-to-date.
sudo apt update && sudo apt upgrade -y -
Configure BIOS/UEFI Settings: For modern GPUs like the RTX 5090, specific BIOS settings are required. Reboot the server and enter the BIOS setup (usually by pressing
DELorF2during startup).-
Troubleshooting BIOS Access: If you cannot see the BIOS screen, ensure your monitor is plugged directly into a port on the RTX 5090 GPU, not the motherboard's video output.
-
Required Settings:
- Secure Boot: Must be Disabled.
- CSM (Compatibility Support Module): Should be Disabled.
- Resizable BAR (ReBAR) Support: Perform the following sequence:
- Enable ReBAR, save, and boot fully into Ubuntu.
- Reboot and re-enter the BIOS.
- Disable ReBAR, save, and boot into Ubuntu.
-
-
Purge Old Drivers & Blacklist Nouveau: To ensure a clean installation, remove any existing NVIDIA drivers and prevent the default
nouveaudriver from loading.# Purge all existing NVIDIA packages sudo apt-get purge '^nvidia-.*' -y # Blacklist the nouveau driver echo "blacklist nouveau" | sudo tee /etc/modprobe.d/blacklist-nouveau.conf -
Install the Correct NVIDIA "Open" Driver: The RTX 50-series requires the "open" kernel module version of the driver.
sudo apt install nvidia-driver-575-open -y -
Reboot and Verify: Reboot the server one last time for the driver to load.
sudo rebootAfter rebooting, run
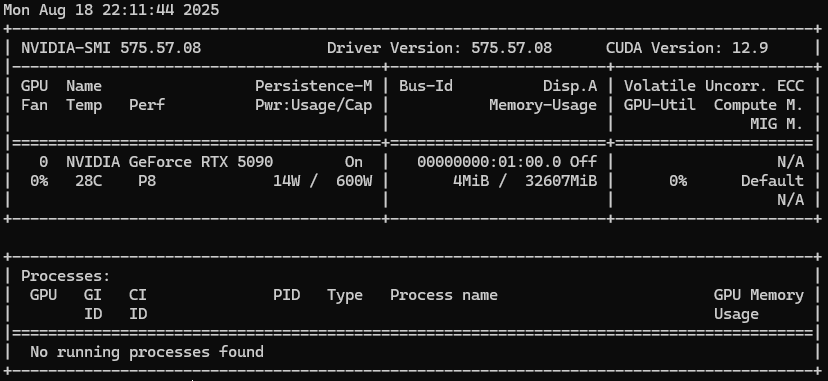
nvidia-smi. You should see a table detailing your RTX 5090. If this command works, your driver is correctly installed.nvidia-smiDo not proceed to the next phase until this command succeeds. You should see something like it is shown below. In case of other messages or an error message, may google be with you.

GPU-Accelerated Container Environment
Because we will run Open-WebUI in a Docker container, we need to install the NVIDIA Container Toolkit to enable Docker containers to access the GPU.
-
Install the NVIDIA Container Toolkit: This toolkit provides the bridge between Docker and the NVIDIA driver.
# Add the NVIDIA repository GPG key curl -fsSL https://nvidia.github.io/libnvidia-container/gpgkey | sudo gpg --dearmor -o /usr/share/keyrings/nvidia-container-toolkit-keyring.gpg # Add the repository to your sources list curl -s -L https://nvidia.github.io/libnvidia-container/stable/deb/nvidia-container-toolkit.list | \ sed 's#deb https://#deb [signed-by=/usr/share/keyrings/nvidia-container-toolkit-keyring.gpg] https://#g' | \ sudo tee /etc/apt/sources.list.d/nvidia-container-toolkit.list # Update the package list and install the toolkit sudo apt-get update sudo apt-get install -y nvidia-container-toolkit # Restart the Docker service to apply the changes sudo systemctl restart docker -
Verify GPU Access from Docker: Run a test CUDA container. This command should execute without errors and output the same
nvidia-smitable from inside the container.docker run --rm --gpus all nvidia/cuda:12.1.1-base-ubuntu22.04 nvidia-smiYour server is now ready for GPU-accelerated containerized applications.
Inference Engine & Web UI Installation
Ollama is a simple inference engine that allows you to run LLMs on your server. It is a great option for running LLMs locally because it is easy to use and it is open source.
-
Install Ollama:
curl -fsSL https://ollama.com/install.sh | shOllama automatically detects the NVIDIA drivers and will use the GPU.
Recommended: Change the Default Model Directory
By default, Ollama stores models in
/usr/share/ollama. To use any other folder as the default model directory, you should configure it so. For the sake of this guide, we will use/mnt/aimodels/modelsas the default model directory.First, stop the Ollama service and create the new directory:
sudo systemctl stop ollama
sudo mkdir -p /mnt/aimodels/models
# Give the ollama user ownership of the new directory
sudo chown -R ollama:ollama /mnt/aimodels/models
Next, create a systemd override file to set the
OLLAMA_MODELSvariable (to use the specified model directory) andOLLAMA_HOST(to allow network connections from Docker). By default, Ollama only listens onlocalhost, which prevents Docker containers from connecting to it. Setting the host to0.0.0.0resolves this.This is the correct way to modify the service without editing the original file.
# Create the override directory
sudo mkdir -p /etc/systemd/system/ollama.service.d

# Create the override file with both environment variables
printf "[Service]\nEnvironment=\"OLLAMA_MODELS=/mnt/aimodels/models\"\nEnvironment=\"OLLAMA_HOST=0.0.0.0\"\n" | sudo tee /etc/systemd/system/ollama.service.d/override.conf
Finally, reload the systemd daemon and restart Ollama for the change to take effect:
sudo systemctl daemon-reload
sudo systemctl start ollama
All models will now be downloaded to and served from your dedicated storage.
-
Install Open WebUI (via Docker): This provides a web interface for interacting with your models. To ensure all application data is stored on the dedicated AI folder, we will use a bind mount to explicitly point the data volume to the directory we want our data at (/mnt/aimodels/open-webui). This is optional but recommended if you need to access Open WebUI data from the host machine or if you have a dedicated space to everything related to AI and its usage.
First, create the directory that will store the WebUI data:
sudo mkdir -p /mnt/aimodels/open-webuiNow, launch the container, pointing the data volume to the directory you just created:
docker run -d -p 3000:8080 \
--add-host=host.docker.internal:host-gateway \
-v /mnt/aimodels/open-webui:/app/backend/data \
--name open-webui --restart always \
ghcr.io/open-webui/open-webui:main
Optional: Mounting Local Document Sets
To give Open WebUI direct access to a folder of documents on your server (e.g., for creating knowledge bases), you can add a second volume mount to your
docker runcommand.If you have already launched the container, you must first stop and remove it before relaunching with the new setting:
# Stop the currently running container
docker stop open-webui

# Remove the stopped container so you can reuse the name
docker rm open-webui
Note: Your user data and settings are safe because they are stored in the
/mnt/aimodels/open-webuifolder, which is not deleted by these commands.Then, launch the new container, adding a second
-vflag to mount your documents folder (e.g.,/mnt/aimodels/doc_sets):docker run -d -p 3000:8080 \ --add-host=host.docker.internal:host-gateway \ -v /mnt/aimodels/open-webui:/app/backend/data \ -v /mnt/aimodels/doc_sets:/app/backend/data/docs \ --name open-webui --restart always \ ghcr.io/open-webui/open-webui:main
First Model Test
At this point we should have a running ollama service and a running open-webui container. The next step is to download a model and verify the entire system is operational and GPU-accelerated.
-
Pull Your First Model: Use the
ollamacommand line to download a model.qwen2:7bis a powerful and efficient starting choice. Light enough for testing our system.ollama pull qwen2:7bThe model file will be stored in your configured
/mnt/aimodels/modelsdirectory. -
Monitor the GPU: In a separate terminal, use
watchto get a live view of GPU status.watch nvidia-smi -
Run the Model in Open WebUI:
- Navigate to the Open WebUI in your browser (
http://<server-ip>:3000). - Refresh the page and select
qwen2:7bfrom the "Select a Model" dropdown. - Ask a question to start a conversation.
- Navigate to the Open WebUI in your browser (
-
Confirm GPU Usage: While the model is generating a response, observe the
watch nvidia-smiwindow. You should see a significant increase in GPU Utilization and Memory-Usage. This confirms the successful end-to-end setup of your GPU-accelerated AI platform.
Congratulations! By following these steps you have successfully set up a GPU-accelerated AI server.
Next Steps
With the platform now operational, you can explore:
- Different Models: Use
ollama pull <model-name>to try other models from the Ollama Library. - System Monitoring: Use
nvidia-smiornvtop(sudo apt install nvtop) to monitor GPU utilization while models are running. - Document Chat (RAG): Place document files in the
/mnt/aimodels/doc_setsdirectory (if you mounted it) and explore the RAG features in Open WebUI.
Service Persistence and Autostart
A key requirement for a server is that its services start automatically without manual intervention after a reboot. The current configuration ensures this behavior:
-
Ollama Service: The Ollama installation script registers it as a
systemdservice. This service is automatically enabled and will start every time the system boots. You can verify its status withsudo systemctl status ollama. -
Open WebUI Container: The
--restart alwaysflag used in thedocker runcommand instructs the Docker daemon to automatically start this specific container whenever the Docker service starts, which includes system boot-up.
Model Management (Adding & Removing)
Managing your library of AI models is straightforward and can be done directly from the command line without any service downtime.
Adding a New Model
To add a new model from the Ollama Library, use the ollama pull command.
# Example: Pulling the Llama 3 8B model
ollama pull llama3
- No restarts are needed.
- After the pull is complete, simply refresh the Open WebUI page in your browser. The new model will automatically appear in the "Select a Model" dropdown list.
Removing a Model
To remove a model and free up disk space, use the ollama rm command. You can get the exact name of the model to remove by first running ollama list.
# 1. List all currently installed models
ollama list

# 2. Remove the desired model by its name
ollama rm llama3
- No restarts are needed.
- After the model is removed, refresh the Open WebUI page. The model will disappear from the selection list.
